| Protocol notes |
Day 1:
Sample Preparation
- Label each of your tubes with 1-4 and your initials. You should have 2 tubes labeled for each number. (2 Tube 1’s, 2 Tube 2’s, 2 Tube 3’s, and 2 Tube 4’s). You will be using the first set of tubes for this Sample Preparation section. Record what you will be putting into each tube in the table below.
- Use tweezers to carefully transfer the first arthropod to a Petri dish. Rinse with water using a pipette and blot dry excess liquid with a paper towel. Take 1-2 pictures for the The Wolbachia Project Database. If the arthropod is smaller than a grain of rice, skip to Step 5.
- Remove the abdomen of the arthropod and cut off a small piece (roughly ~2 mm, or small enough to fit in the bottom of a microcentrifuge tube).
|
|
- Remove as much preservative and water as possible. If the arthropod is large or has a thick/tough exoskeleton, dissect out the reproductive tissues. Arthropods with a thick exoskeleton should be cut into multiple pieces.
- Place the specimen into a labeled 1.5 ml microcentrifuge tube and repeat for remaining arthropods.
|
|
Cell Lysis & DNA Precipitation
- Add 180 μl Buffer ATL to the first tube. Buffer ATL is a tissue lysis buffer.
- Use a sterile pestle to grind the sample for 1 minute. This is the most critical step of the entire procedure, as it is necessary to obtain high DNA yield. Grind each sample thoroughly.
|
|
- Using a new pestle for each tube; repeat Steps 6 and 7 with remaining samples.
|
|
- Add 20 μl Proteinase K to each tube. Proteinase K will destroy DNases that break down DNA.
- Add 200 μl Buffer AL to each tube and immediately mix by vortexing for 10 seconds. Buffer AL lyses open cells.
|
|
- Incubate in the water bath for at least 15 minutes or longer at 56 °C.
- Place the tubes in the centrifuge and spin the tubes for about 30 seconds to pellet debris.
|
|
- Using a new tip for each sample, transfer the liquid lying above the pellet (~400 μl) to the other 1.5 ml tube with the same number label. Do not disturb the pellet.
|
|
- Discard the old tube of pellet debris and keep the liquid. Repeat steps 13 and 14 for other samples.
|
|
- Add 200 μl ethanol to each tube and mix by vortexing for 10 seconds. Ethanol precipitates DNA.
|
|
- Store DNA in the refrigerator until next class.
Day 2:
DNA Purification
- Collect four DNeasy spin columns fitted with four 2.0 ml collection tubes and label the lids of the spin columns with 1-4. NOTE: The Spin Column sits inside the Flow Through tubes. DO NOT SEPARATE the Spin Column from the Flow Through tube.
|
|
- Pipet (or carefully pour) the liquid from Tube 1 from yesterday (including any precipitate) into the spin column #1. Using a new pipette tip for each transfer, repeat this process with the three other tubes. Make sure to keep the tube numbers consistent. Throughout the procedure, be careful not to touch the filter or get liquid around the rim of the column.
|
|
- Centrifuge all tubes for 1 minute. The DNA is now caught in the filter of the spin column.
|
|
- Carefully remove the spin columns from the collection tubes and discard the flow through (liquid) from the 2.0 ml collection tubes into the waste cup. Replace the spin columns back into their emptied collection tubes.
|
|
- Add 500 μl of Buffer AW1 to each spin column. Use caution to not touch the white membrane with your pipette tips. Buffer AW1 washes the DNA.
|
|
- Centrifuge all tubes for 1 minute.
|
|
- Again, discard the flow through waste from the 2.0 ml collection tubes into the waste cup and place the spin columns back into the same 2.0 ml collection tubes.
|
|
- Add 500 μl Buffer AW2 (a second wash buffer) to each of the four tubes and centrifuge for 3 minutes to dry the spin column membrane.
|
|
- Allow the tube to air dry for 2 minutes. This will evaporate the leftover ethanol. While you are waiting, label 4 new 1.5 ml microcentrifuge tubes with 1-4 and your initials.
DNA Elution
- Carefully remove the spin column so that it does not make contact with residual ethanol in the tube. If ethanol is still present on the membrane, empty the collection tube and spin again. Place each spin column into the corresponding 1.5 ml microcentrifuge tube.
|
|
- Pipet 100 μl of Buffer AE directly onto the spin column membrane. Let sit at room temperature for 1 minute. Buffer AE is an elution buffer that rinses the DNA off the spin column filter and into the 1.5 ml tube.
|
|
- Centrifuge for 1 minute. NOTE: At this point, you will have two sets of lids. When you place them in the centrifuge, keep the lids down against the center of the centrifuge, not sticking out. The eluted DNA will be collected in the 1.5 ml tube.
|
|
- Discard the spin columns and KEEP the labeled 1.5 ml tubes. The DNA is now in the 1.5 ml microcentrifuge tubes.
|
|
- Store the DNA tubes frozen at -20 C until PCR.
|


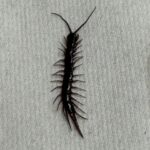 Centipede – MJAR
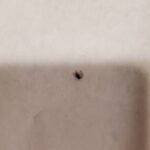 Fruitfly – MJAR
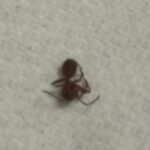 Ant – MJAR
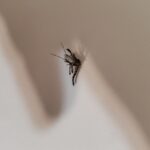 Mosquito – MJAR
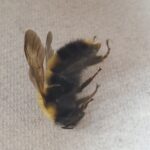 Bumblebee – MJAR